Showing posts with label Photoshop. Show all posts

14 Tutorial Photoshop Untuk Efek TEKS

Text dan Layer tools dalam photoshop merupakan dua elemen yang amat hebat sekiranya digunakan dengan cara yang sesuai dan betul. Dengan memanipulasi 2 elemen ini, pelbagai efek/kesan yang menarik dapat dihasilkan. Disini saya ingin berkongsi 20 tutorial yang saya anggap amat hebat bagi menghasilkan efek khas terhadap teks.

1. Create Destructive Black and White Lettering with a Dramatic Splash Effect

Belajar bagaimana untuk membuat beberapa penghurufan ekspresi, yang mana menghubungkan idea-idea dengan satu kata pusat. Anda akan menukar teks biasa ke menjadi bentuk yang hebat, contoh musnah, dan memberi gaya yang unik pada akhirnya.

lost

2. Stunning 3D effects in 30 minutes

Kesan khas 3 dimensi yang hebat ini dapat dihasilkan dengan teknik yang mudah dan ringkas, dan hanya mengambil masa lebih kurang 30 minit!

04

3. How to Quickly Create a Stylish Retro Text Effect

Pelajari bagaimana mewujudkan kesan khas berlatarbelakangkan tema retro. Penggunaan alat Perspektif akan anda pelajari melalui tutorial ini.

retr

4. Create a spectacular grass text effect in Photoshop

Dalam tutorial ini anda akan menggunakan aspek semulajadi, iaitu rumput sebagai kesan khas pada teks, dan ianya amat menarik bagi saya!! anda patut mencubanya.

10

5. Plastic text

Hasilkan permukaan teks yang seakan-akan plastik menggunkan photoshop sepenuhnya.

plastic-text

6. Text in stitches

Dalam tutorial ini, anda akan didedahkan kepada penggunaan fungsi CUSTOM BRUSH set, yang mana pada akhir tutorial, anda akan menghasilkan gambar seperti dibawah ini.

13

7. How to create a gold text effect in Photoshop

Pelajari bagaimana menghasilkan teks dengan efek keemasan yang sangat elegen. Seni yang kelihatan halus, namun berimpak besar!

14

8. Paper-craft text effect

Yang ini saya amat suka, secara peribadi saya amat mengkagumi kesan efek yang dihasilkan. Tidak rugi sekiranya anda mencuba.

16

9. Dramatic text-on-fire effect in Photoshop

Menggunakan stok foto gambar api, untuk memberikan efek api pada teks yang sememangnya kelihatan semulajadi dan “eyes catching”.

17

10. Warm neon glow

Hanya enam langkah untuk menghasilkan efek hebat ini.

neon-glow

11. Super-cool frilly bits typography

Dalam tutorial ini, anda akan belajar bagaimana untuk memanipulasi beberapa vektor bersama dengan huruf bagi mewujudkan reka bentuk yang sebenarnya unik dan menarik.

20

12. Decorative text

decorating-text

13. A slick supernatural text effect

22

14. Light burst

light-burst

SUMBER TUTORIAL

read more

Cool Typography Wallpaper

typographic ak collectionThis is another typography wallpaper which is i made with Photoshop. Its is one of the most simple graphic I ever made. And how did I do it?

Here is the step in producing the above images, its is extremely simple and take a few minutes only.

First create a new layer with dimension of 1200x800, and then fill this background with black color. You can switch the foreground color just by pressing D button on your keyboard.

After that, using type tools, use this configuration font size 16pt, color is a bit brighter than black. Then start typing words, this layer is for the small words as you can see in the picture above.

Just write a simple sentences, and then you can copy and past it to fill all the area. You don’t have to type it all. Okay, be efficient!

When you done with the words, now you can rotate this words 45degree, so it will look like the above picture. When you are done with rotating the word, again using font tools, resize the word area, until it fill all the area, then copy paste the word to fill the whole area. Get it? This part you need to play with the area and magnification, so that you can see the whole area is filled with word. Just to remind, the word is best to be UPPER CASE (capital letter), you can adjust the spacing, so that it will look full. When you are satisfied, you can resterize the word.

And now Using the font tools, we are going to make a large word, as you can see on the image above, the ak word is the largest (white color). I’ve been using this configuration (700pt font size, and white color, discognate font style) You can use any style as long its fit your desire, and also you can use vector picture from Illustration. But in this tutorial, I’m just using the font tools. after you finish and satisfied with the word, resterize it just like the first word we made.

Now we have 3 layers. The next step is press the control button on your keyboard and click on the thumbnail of the larger word, and you will have the selection. Now hide this large word layer, and click on the small word layer, and the right click, chose layer via cut!

And now you are having new layer, on this layer, go to Layer style and select Color Overlay, change the color to White (much better) or any color you like. Now, your large word is done!

Next is the red word COLLECTION, you can see on the above image. This is just simple one. create it with font tools, and then resterize it, copy the layer, making it two layer. the bottom one we add some blur effect (Gaussar), so it will look glowing.

And then the final step is adding the layer effect to the small word layer. Select the small word layer, and the go to layer style, chose Inner glow. and you can costumize it yourself! done!! Now you have been creating an awesome simple typography wallpaper!

For more detail and precise instruction you can visit ABDUZEEDO.com

Thanks and enjoy.

read more

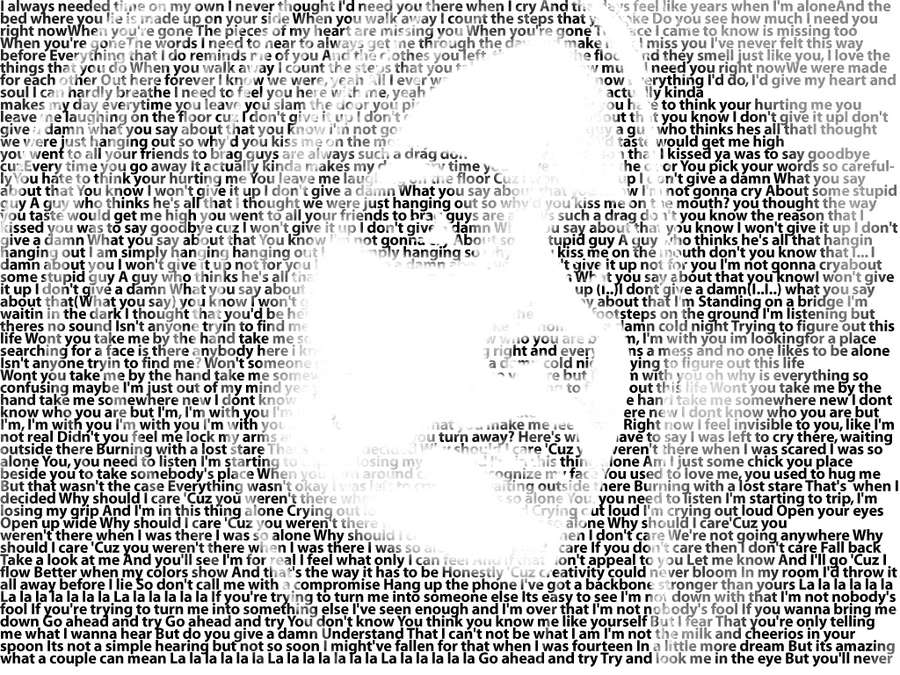
Avril Typography


After playing around with photoshop, and some tips about layer manipulation, i made to produce this kind of typography. Its not perfect, basic black and white. Because its my first time making typography. And the process is very linear. And the word is actually Avril's lyric in many of her singles!

First thing I do was find the right photo of avril with super high resolution, I import the picture into photoshop. After that, I made an adjusment with the brightness and contrast. and final touch for the fhoto was desaturate it. Thats it! then, I'm looking for the lyrics on the internet and make it as one long sentences (It takes time, but because i love Avril so much and her song I dont mind at all).
then I play with layering and blending. Im still new in explaining my workline, but Its easy, if you have a basic of photoshop, you can try it by yourself. And this is the direct link to my DevianArt.. Enjoy!
read more

Diamond Bokeh


This Diamond Bokeh Effect was created using Adobe Photoshop, what is the best part in this picture, i did not use any stock photo. I just made a new brush, one gray background layer, one diamond gradient layer with rainbow colour, and 3 Bokeh layer, with diffrent amount of blur effect. For more detail watch this tutorial. Thank you.
read more

Photoshop Manipulation


Here are two of my first succesfull photoshop project, nothing much, too simple, i take about an hour to finish them, the layering is not too many, and also the stock photo for each project is less than 5. I provide the direct link to each picture in my Devian Art.

The 1st picture is called Maximomentum
The 2nd picture is called Move along
read more